Page Created 01/07/12
Last Updated 06/16/12
By Paul Marossy
There are a few things on the Convertible that are almost impossible to replace: the power transformer, output transformer and the can type filter caps. The filter caps however can be replaced, with some work.
Recently (1/2/12) I had reason to believe that the Mallory Type CGS can type caps filtering the DC right after the 5U4G rectifier were going bad. It turns it it wasn't the case, but it led me to a troubleshooting odyssey that I thought was worth sharing.
There are a few problems involved with replacing the can type capacitors. The first thing is that an exact replacement for them, a Mallory Type CGS 200uF 350V (Computer Grade caps), is simply not available anymore. It appears that they are no longer manufactured and finding some NOS ones seems to be exceedingly rare. So then one is faced with needing to find a suitable substitute for these caps if can types are not to be used in their place. The problem lies more in the physical mounting than in the replacement capacitor itself. The second and perhaps more important issue is the amount of capacitance used. Some of my online sources tell me that these two capacitors wired in series (which gives a voltage rating of 700V and 100uF) seem to be too big for the 5U4G rectifier tube and that it could cause the tube to arc. This reminds me of a conversation I had with Kevin Beller at Seymour Duncan once about the rectifier tube and how he recommended using NOS ones instead of the new ones because the new ones have a much higher failure rate than the NOS ones do. Perhaps the size of these caps is a factor in that?
So then there is three things to be concerned with here: The exact capacitance to be used, the physical characteristics of the capacitor and providing some
protection for the power tranformer in the case of a rectifier tube failure. As far as I am concerned, trying to match the 200uF value, or maybe going slightly under
it with 150uF or 180uF should be fine. Mouser.com has a 130uF and a 250uF Mallory type CGS replacement cap that is exactly the same physically as the OEM capacitors, but one
seems too big to safegaurd the rectifier tube from arcing and the other one seems to small to guarantee that there won't be problems with humming/buzzing. If different
type capacitors are used than the can types, then it presents problems of how to physically mount them inside the chassis. There is room inside the chassis to work with,
however. It would be a bit a challenge safely mounting them somewhere, but not impossible. RG Keen has suggested putting a pair of diodes in series with the rectifier tube
to prevent damage to the power transformer in the event of rectifer tube failure, which seems like a very good idea I have yet to institute. This can be done simply by using a pair
of 1N4007 diodes in series to each of the wires that connect to pins 4 & 6 of the rectifier tube.
Click here to see these diodes as installed on my own Convertible. You can also use 1N5399 diodes, which are currently available at RadioShack. This cheap, simple and quick modification is well worth the trouble when you consider that a replacement power transformer is not available anymore.
When I originally started on this filter cap problem, I suspected these can type filter caps may have been failing because of the bass being very "farty" and even a motorboating sound developed. Sounds like classical bad filter caps, right? But when I took the chassis out and removed the main PCB to get to the mechanical screw connections, I found that the connections were corroded and at least one of the screws was a little loose. So I cleaned all of the mating surfaces with a piece of fine sandpaper and used some lock washers to ensure that the screws don't come loose again. After that exercise, the amp was sounding good again, but then a whole new set of problems arose. So I pulled out the chassis again and found a couple of cold solder joints on the tube sockets among a few other things I fixed (mostly bad soldering which I had to fix). It turned out that the source of my motorboating and distortion problem had to do with a bad connection on the ground of one of the master volume controls. When I fixed that, the amp was sounding better than it ever has! Now I am very happy with the amp. It just takes some patience and a good eye to catch these things. Took me three trys to get it all worked out, though. If I weren't able to do this stuff myself, I would be pretty frustrated with the amp tech, but it wouldn't have been his entirely his fault. In this particular amp, one thing can appear like several other things due to the complexity of the amp.
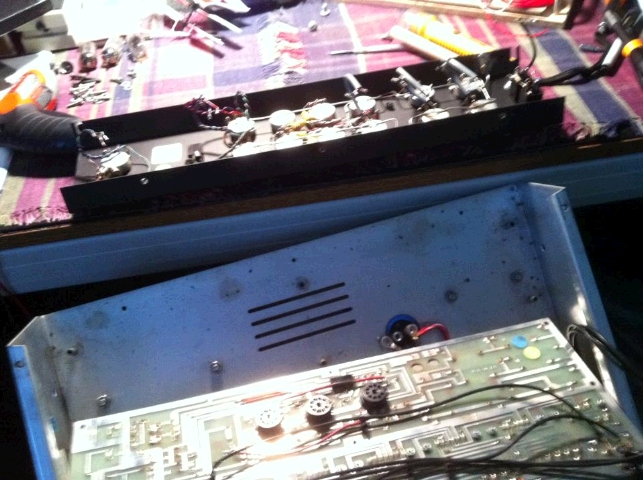
Getting to the connections on the filter caps requires basically taking the whole chassis apart. The control panel has to come off, so all of the wires from the pots, jacks and switches to the main PCB have to be removed. Not a big deal since they are not soldered connections, but you have to take careful notes of which wire connects where (it's not as bad as it might sound). I marked the PCB to make that task easier. Then you have to disconnect the power and output transformers from the main PCB (quick disconnects once again) and then remove the nine screws fastening the main PCB to the chassis. Then you can lift the PCB out to get to the mechanical connections on those filter caps. Then it's just a reverse process to put it all back together after you have done whatever it is that needed to be done. Have patience and don't be in a rush and it won't be frustating. It's really not hard to work on, just a little tedious.
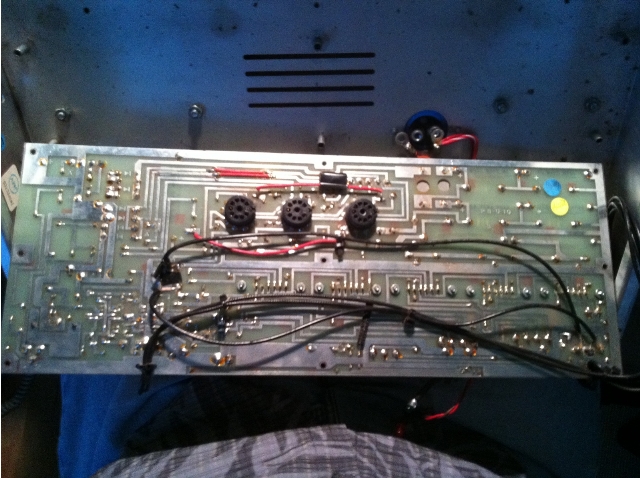
Here I have the main PCB removed from the chassis.
And here is what the connections look like on those can caps.
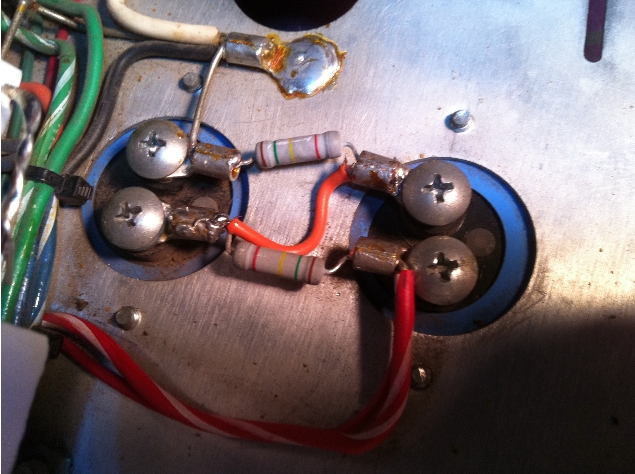
I hope this helps anyone who finds themselves confronted with needing these can type caps replaced. It can be done! But first check the connections on those caps, you might find that they are corroded and not making a good solid connection anymore, as was in my case.