Dunlop GCB-95 CryBaby
Mods
By Paul Marossy
Last Updated 06/04/05
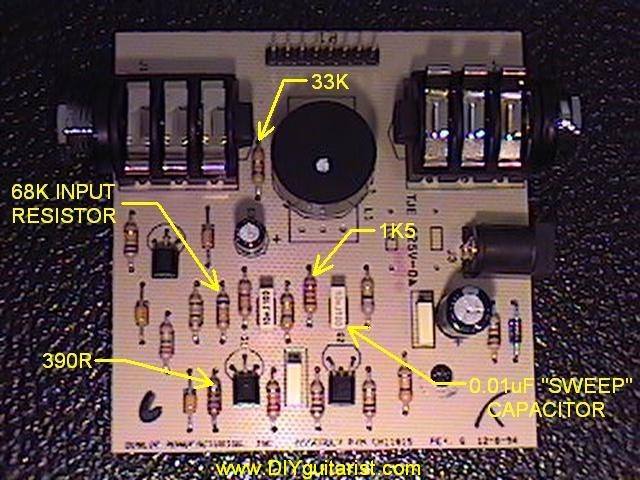
To my ears, the new manufacture Dunlop CryBaby wahs sound a little lame right out of the box. The tone sounds thin, the bass response is a little weak, and they are not very vocal sounding at all. I originally bought my CryBaby just for the shell. I was intending to put a vintage V847 wah circuit in it, but with my current setup, I could not make it stop humming no matter what I tried to do, until I found the culprit - the pedal board power transformer was too close to the wah, and so it picked up 60-cycle hum and amplified the heck out of it with any kind of distortion pedal. Anyway, until I found the source of the problem with the vintage circuit, I looked into what modifications I could do to make the new GCB-95 circuit sound better and recorded it here for posterity. There are a few different versions of circuit boards in the Dunlop wahs, each with different layouts and slightly different components. My wah has the GCB-95, Rev. G PCB in it. Below is a picture of the GCB-95 Rev. G circuit board. The ones manufactured before this one had a green circuit board, but the component layout is the same.
Stuart Castledine's old wah
wah mods page used to have a DIY section which me the basic blueprint
for tailoring the new CryBaby circuit to my liking. Here's what I did:
I wanted the sweep to sound a little thicker and I wanted a little more bass
and midrange response. So I changed the sweep cap from the stock 0.01uF to a
0.022uF. (The sweep cap is between the emitter of Q2 and the inductor) This
gives a little more bass response and makes it sound fuller on the high end
without sacrificing the treble response too much.
To increase the midrange, I replaced the stock 1.5K resistor between the base
of Q2 and the inductor to a 2.2K resistor. This also helps to smooth out the
response between the bass and treble.
I also wanted my wah to sound more vocal, so I replaced the 33K resistor in
parallel with the inductor with a 47K resistor instead of the recommended 68K.
I really like the way this sounds, much, much more vocal sounding than stock.
(This may also be because of the other modifications I have made)
Finally, I replaced the stock 470 ohm resistor at the emitter of Q1 with a 270
ohm resistor. This gives the circuit a little more gain, and it also helps to
increase bass response some, too. Now my volume doesn't drop off the way it
did before I made these modifications.
The only other thing that I may consider down the road, is replacing the stock
inductor with a replica "stack-of-dimes" type or a new manufacture
Fasel one. I'm still not fully convinced that the new Fasels sound as good as
the original ones did, though. I probably will leave things as the are, since
it sounds good to me. I have not measured the inductance of the inductor on
my circuit board, but from the information I can find, it appears that it is
660mH instead of the original 500mH used in the vintage Vox Clyde McCoys. But
then again, most of the inductors made were all considerably above the 500mH
inductors in the first wah pedals that were manufactured. The old wah pedals
were just as highly variable in sound as the original Fuzz Faces were.
In conclusion, now I am quite happy with the sounds this wah makes. It sounds
just about as good as my vintage wah circuit does! It costs five dollars
or less for the parts and takes less than an hour to perform these modifications
with the careful use of some de-soldering braid.